Developer Documentation
Note
This documentation assumes a basic understanding of the command line. Here’s a quick (and free!) crash course if needed.
HPC/Local Installation
At the moment, the only supported way to install DWIQC is via “bare metal” using the python package manager pip. A python version >=3.4 will come with pip preinstalled. Esnure that you have both python and pip installed on your HPC or local machine before attempting to install DWIQC.
Creating a Virtual Environment
With python and pip installed, you can download and install DWIQC from PyPi. You may choose to do so in a virtual environment. The examples here (and in other portions of the documentation) will assume that you are using a virtual environment, though it won’t affect any installation or running instructions.
To create a virtual environment, named dwiqc in this example, run the following command:
python3 -m venv dwiqc
Activate the virtual environment:
source dwiqc/bin/activate
Your terminal window should look something like this with the name of the virtual environment in parentheses and a directory with the virtual env name.

Installing DWIQC and Dependencies
Install DWIQC from the command line using pip:
pip install dwiqc
DWIQC will being installing along with some of its dependencies. It should only take a few moments. Run pip show dwiqc to ensure that it was installed successfully.
DWIQC relies on the prequal, qsiprep, chromium, and FSL software packages so we will need to download those respective containers into your local environment. DWIQC uses specific and customized versions of these packages. They can be easily installed using DWIQC’s install-containers functionality. DWIQC will default to installing the containers at ~/.config/dwiqc/containers; however, the user can specify a download directory using the --install-location commmand:
dwiQC.py install-containers --install-location /path/to/install/location
The containers will take 30-45 minutes to download depending on your connection speed. The containers will occupy ~30GB of storage space so pick a directory with plenty of free storage. Once the containers are downloaded, you’ll be ready to run dwiqc!
XNAT Installation
The following section will describe how to build and configure DWIQC as an XNAT plugin.
Building the Plugin
Clone the xnat-1.8 branch from the github.com/harvard-nrg/dwiqc
repository
git clone -b xnat-1.8 --single-branch https://github.com/harvard-nrg/dwiqc
Change into the repository directory and compile the plugin using Gradle
./gradlew jar
Once the plugin has been compiled, move the resulting .jar into your XNAT plugins directory
mv ./build/libs/dwiqc-plugin-1.0.0.jar ${XNAT_HOME}/plugins/
Configuring Nginx
You will have to do a little bit of extra configuration in the nginx.conf file on the XNAT server. Without this configuration, XNAT will start downloading all of the DWIQC reports to your local machine and you won’t be able to view them on the browser. Here’s a way around that!
First, navigate to your nginx directory. This might be located at /etc/nginx if you’re running XNAT on “bare metal” or under your xnat-docker-compose directory if you’re using that to run your XNAT. Once you’re there, cd into the conf.d directory and open up the server config file using your favorite text editor. xnat-docker-compose users may have a file named nginx.conf.
Your nginx.conf file may look something like this (lines of interest highlighted):
  #user www-data;
  worker_processes auto;
  #pid /run/nginx.pid;
  events {
    worker_connections 1024;
    # multi_accept on;
  }
  http {
    ##
    # Basic Settings
    ##
    sendfile on;
    tcp_nopush on;
    tcp_nodelay on;
    keepalive_timeout 100;
    types_hash_max_size 2048;
    # server_tokens off;
    # server_names_hash_bucket_size 64;
    # server_name_in_redirect off;
    include /etc/nginx/mime.types;
    default_type application/octet-stream;
    ##
    # SSL Settings
    ##
    #ssl_protocols TLSv1 TLSv1.1 TLSv1.2; # Dropping SSLv3, ref: POODLE
    #ssl_prefer_server_ciphers on;
    ##
    # Logging Settings
    ##
    access_log /var/log/nginx/access.log;
    error_log /var/log/nginx/error.log;
    ##
    # Gzip Settings
    ##
    gzip on;
    gzip_disable "msie6";
    # gzip_vary on;
    # gzip_proxied any;
    # gzip_comp_level 6;
    # gzip_buffers 16 8k;
    # gzip_http_version 1.1;
    # gzip_types text/plain text/css application/json application/javascript text/xml application/xml application/xml+rss text/javascript;
    ##
    # Virtual Host Configs
    ##
    #include /etc/nginx/conf.d/*.conf;
    #include /etc/nginx/sites-enabled/*;
    server {
      listen 80;
      return                301 https://cbscentral02.rc.fas.harvard.edu$request_uri;
    }
    server {
      listen 443 ssl;
      ssl_certificate       /etc/pki/tls/cbscentral02_rc_fas_harvard_edu.crt;
      ssl_certificate_key   /etc/pki/tls/cbscentral02_rc_fas_harvard_edu.key;
      location / {
          proxy_pass                          http://xnat-web:8080;
          proxy_redirect                      http://xnat-web:8080 $scheme://localhost;
          proxy_set_header Host               $host;
          proxy_set_header X-Real-IP          $remote_addr;
          proxy_set_header X-Forwarded-Host   $host;
          proxy_set_header X-Forwarded-Server $host;
          proxy_set_header X-Forwarded-For    $proxy_add_x_forwarded_for;
          proxy_connect_timeout               150;
          proxy_send_timeout                  100;
          proxy_read_timeout                  100;
          proxy_buffers                       8 4k;
          proxy_max_temp_file_size            2048m;
          client_max_body_size                0;
          client_body_buffer_size             128k;
          # Don't download pdf reports when imbedded in an iframe
          location ~ /data.*\.pdf$ {
            proxy_pass http://xnat-web:8080;
            proxy_hide_header Content-Disposition;
          }
          # Don't download qsiprep html report when imbedded in an iframe
          location ~ /data.*qsiprep\.html$ {
            proxy_pass http://xnat-web:8080;
            proxy_hide_header Content-Disposition;
          }
          # Don't download svg files when imbedded in an iframe
          location ~ /data.*\.svg$ {
            proxy_pass http://xnat-web:8080;
            proxy_hide_header Content-Disposition;
          }
      }
      access_log /var/log/nginx/xnat.access.log;
      error_log /var/log/nginx/xnat.error.log;
  }
  }
This is a bit overwhelming but the part to focus on is at the bottom starting with the comment that says Don’t download pdf reports when imbedded in an iframe. Copy and paste all three location blocks so that XNAT doesn’t automatically download the pdf files, qsiprep.html and the svg files. So just this section:
# Don't download pdf reports when imbedded in an iframe
location ~ /data.*\.pdf$ {
  proxy_pass http://xnat-web:8080;
  proxy_hide_header Content-Disposition;
}
# Don't download qsiprep html report when imbedded in an iframe
location ~ /data.*qsiprep\.html$ {
  proxy_pass http://xnat-web:8080;
  proxy_hide_header Content-Disposition;
}
# Don't download svg files when imbedded in an iframe
location ~ /data.*\.svg$ {
  proxy_pass http://xnat-web:8080;
  proxy_hide_header Content-Disposition;
}
With that added to the nginx.conf file, you’re ready to activate your plugin!
Note
If tomcat or the docker containers are running when you make this change you will have to restart them!
Activating the Plugin
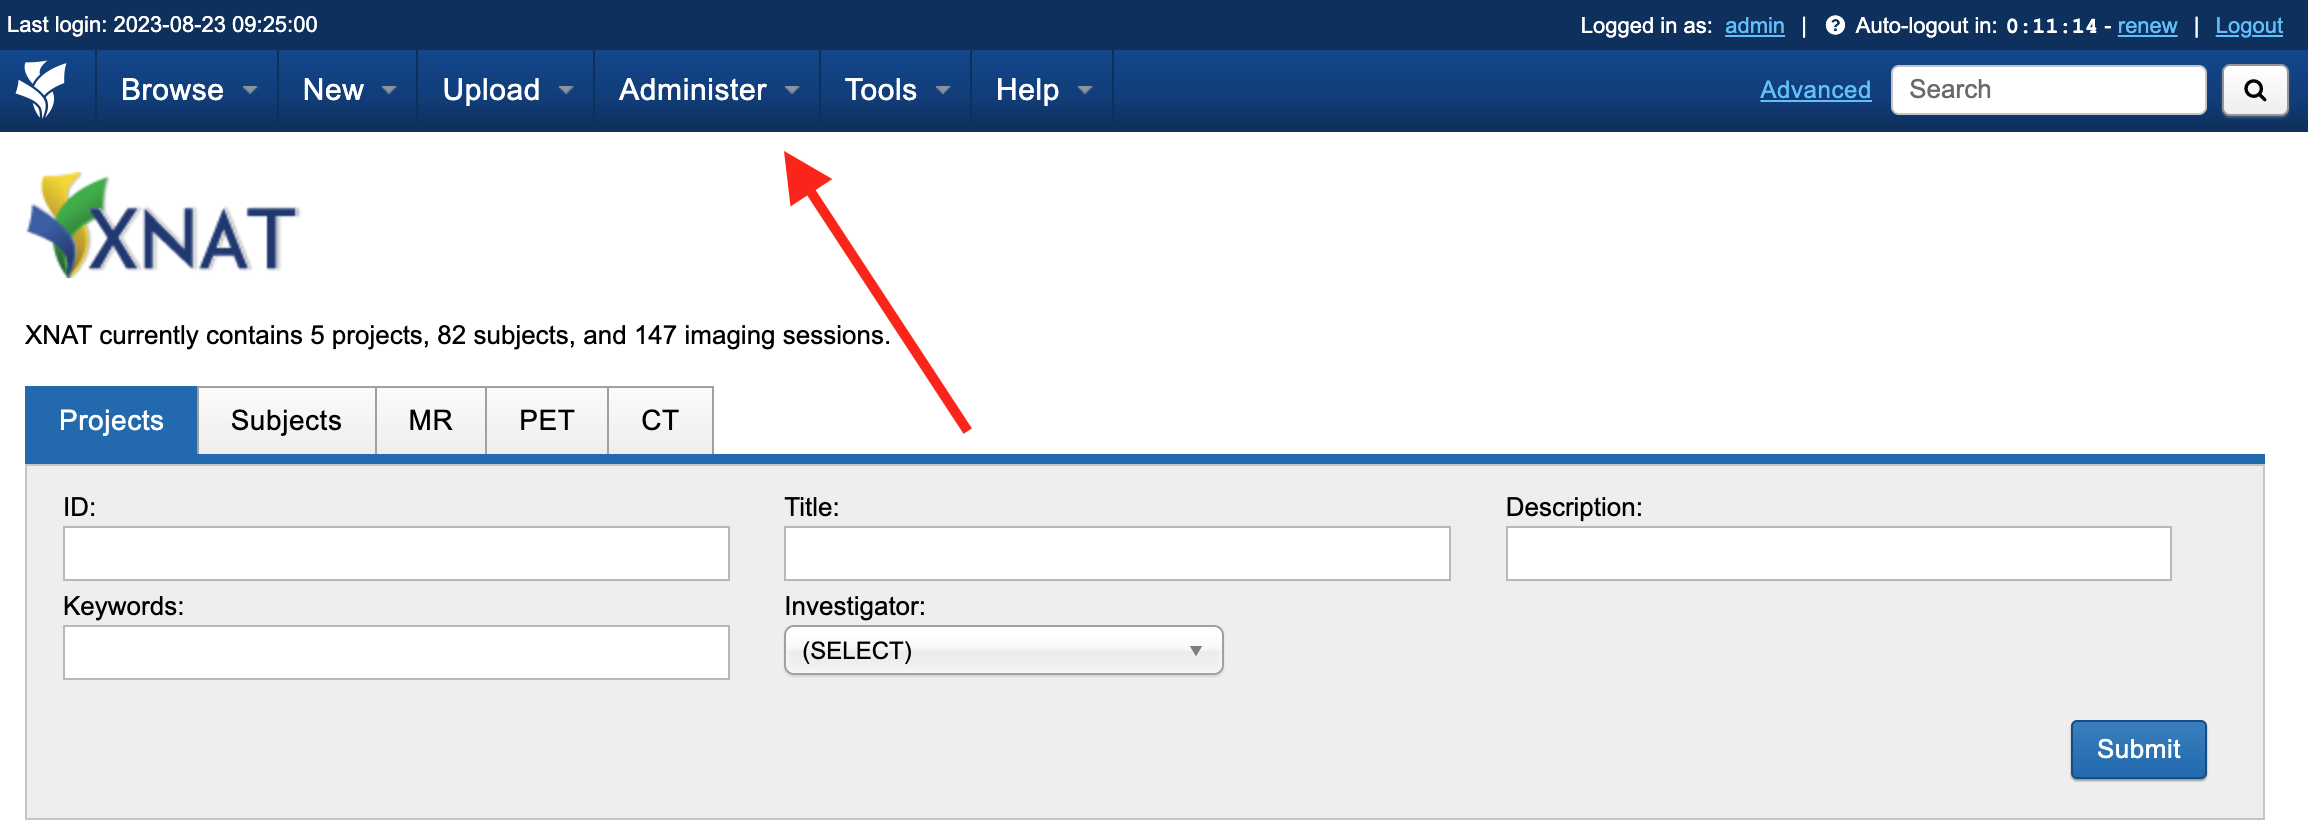
There are several necessary steps to activate the DWIQC plugin via your XNAT instance’s home page. First, login and click on the Administer button at the top:
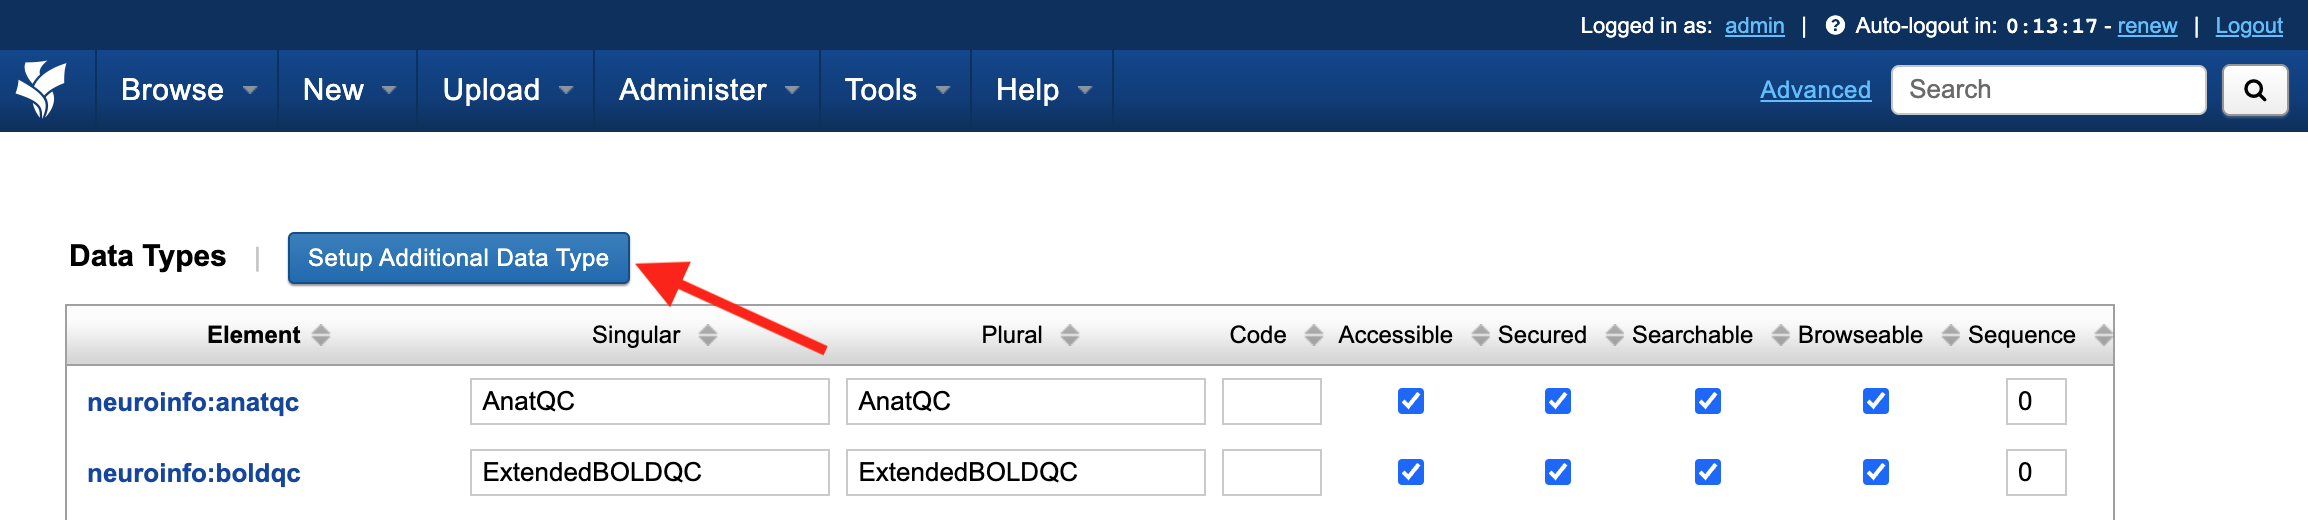
Next, click on Data Types:

Click on Setup Additional Data Type:
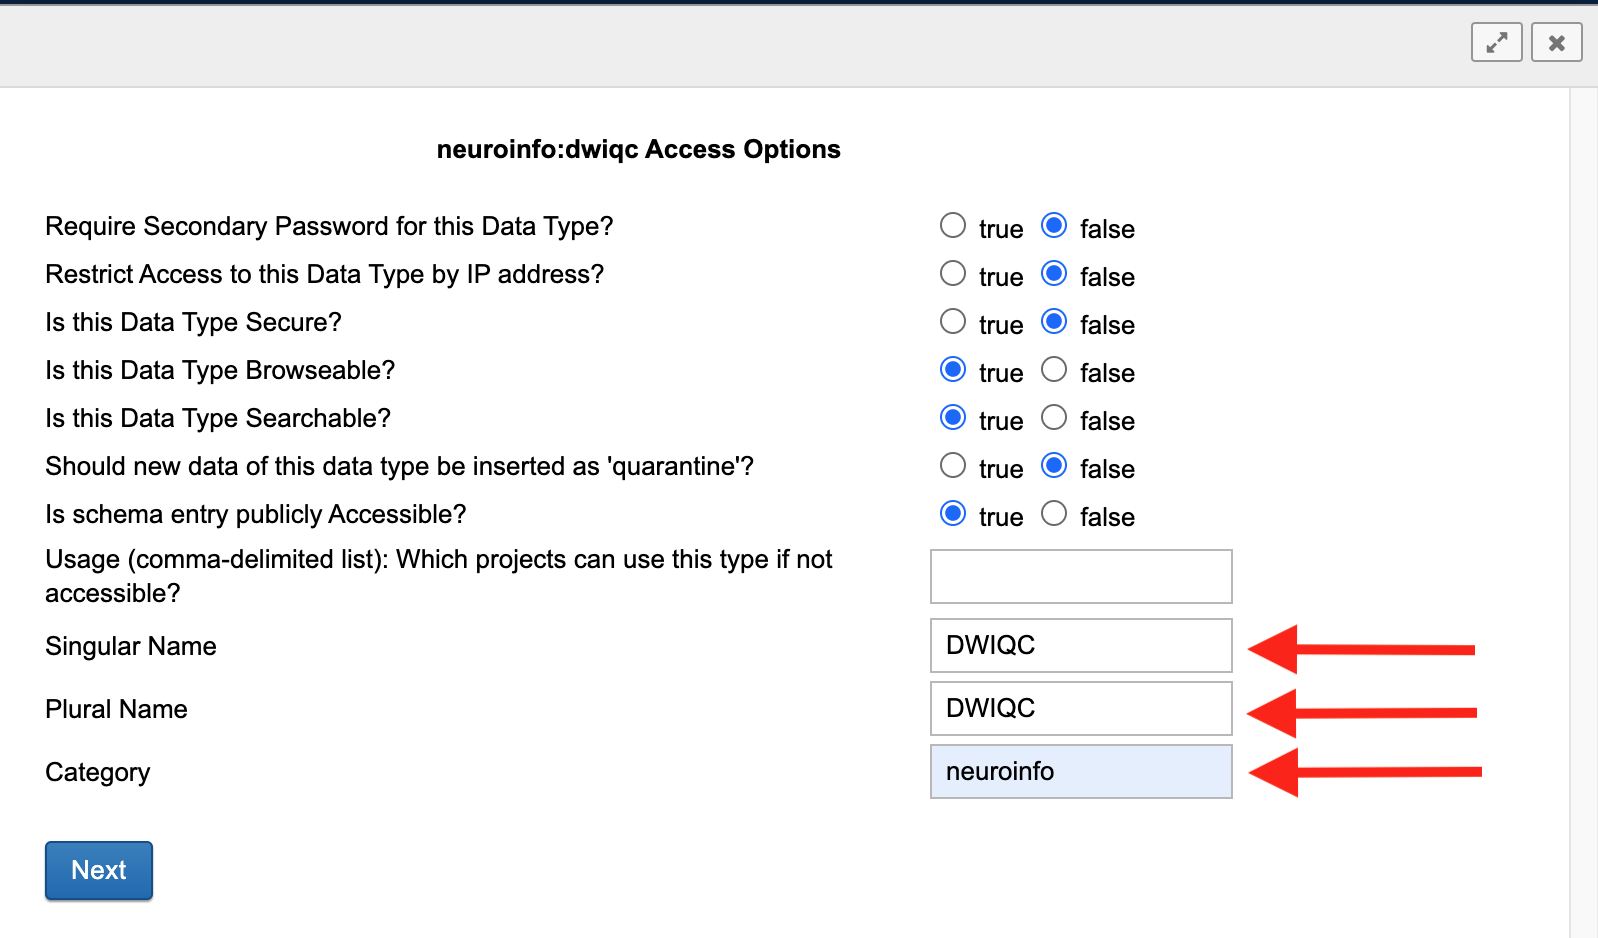
You will see a drop down menu. Select neuroinfo:dwiqc and click Submit.

You can leave all of the True/False statements as they are in this window (unless you have a reason to change them). Fill in the boxes labeled Singular Name, Plural Name, and Category with the information shown below and click Next.
Click Next through the remainder of the windows without editing anything, and Voila! DWIQC is now configured on your XNAT instance.